Saturday, December 19, 2009

Christmas Knitting - part 1

Have you ever knitted a potato-chip scarf?  Ever heard of one?  A friend of mine told me she was making one and so I had to go on Google and find one, too.

I found several patterns -- and the name can mean a couple things.  One, it looks like a long curly fry.  Two, you can't stop at just one.

Basically it is a knitted flounce that can be worked to any length.  The first pattern is done on a circular needle and casts on anywhere from 50 to 110 (or more) stitches.  The scarf is knitted in garter stitch a total of 8 long rows, with every other row doubling the stitches by knitting an increase in each stitch.  Another pattern casts on only 20 to 24 or so stitches and is worked in a series of short rows (stopping part way and then turning the work and knitting back to the beginning of the row).

The problem I had was determining if I had enough of any one yarn to work the long scarf.  It is definitely the eaiser pattern since you don't have to do any counting -- just sit and knit.  I figured if I did the short-row version I could just keep knitting until it was the length I wanted or I ran out of yarn.

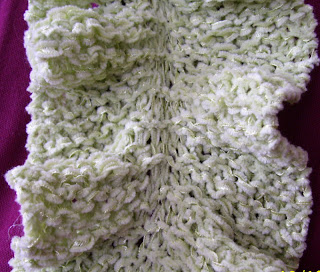
So I did a test of the first short-row pattern.  I have ~240 yds of a discontinued yarn -- Sensations Carlo that is described on the label as a "versatile shimmering tape yarn."


The pattern beautiful and actually makes a double flounce.  But I could tell I didn't have enough yarn to make a scarf long enough to be usable.  Maybe I could make it long enough to attach to a garment as a collar .. but that's not my style.


I have another pattern I am going to try -- later, after the holidays -- that will make a single flounce and I will be able to use all the yarn to whatever length it ends up being.  But, I wanted to make a gift and the giftee's (is that a word?) favorite color is blue.

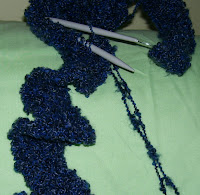
So I found some yarn in the stash that had plenty of yardage and is a combo of blue & black -- so good to wear with jeans.  I decided to cast on 90 stitches (size 11, 36" circular needle).  On the increase rows that became -- 180 -- 360 -- 720 stitches -- and ended up a length ~5 ft total.  I did a sample starting with 10 st (20 - 40 - 80)  to make sure I would like the end effect with my yarn and needle size (tried a couple different needle sizes so I'd know what size to buy in the 36" circular)  and then worked on the real one.  You don't see the flouncing effect until you are finished and start to bind off.


and VOILA -- the finished scarf -- ready to be wrapped and shipped ....


This was an easy project -- one row all you do is knit.  The next row you increase by knitting in front and back of each stitch.  No counting!  But by the end if you can't work an entire row in a sitting, with the yarn I was using (Yarn Bee, Boucle Traditions) it was hard to tell if I was on a straight knitting or an increase row.  So when I would leave the work, I would leave myself a note stuck to the needles.


Since I have another ball of this yarn -- I am going to make another for my daughter to go with her new black jacket ... and then I'll work on my green one ... and then ... (can't stop at just one!)

Wednesday, December 16, 2009

Christmas Sewing -- part 2

Last night I attended the Christmas party for my neighborhood ASG group and decided in the morning that I should have a new top that looked a bit more festive than anything in my closet. 

So armed with $4 worth of Wal-Mart bargain table crushed velour knit that I had just picked up two days before for the stash and my TCC software, I printed out a new t-shirt pattern with a bateau neckline.

I had already decided to wear either my rope pearl necklace or my chatelaine that a friend made me a couple years ago.  My pants choices were brown or green -- and the chatelaine is green -- so ... no brainer... the chatelaine it was!  (and ASG members would recognize what a chatelaine actually is!)  Since that would definitely be the "star" of this outfit, I decided on a bateau neckline.

It went together very well.  Based on my Sewing with Knits book by Connie Long, I used 5/8" seam allowances and the Dual Feed (walking foot) on my Janome.  Another tip I used (credit to Linda Lee) was that I pressed up the hem allowances before stitching the shirt.  That was easy to do at the beginning of the project and it made the finishing go much quicker.  Little things sometimes mean a lot when you are under the gun for time.


 The top was very comfortable and just right for the occasion.  Will I wear it often?  I think not ... but now it is in the closet the next time I need "dressy casual."  Since it is a neutral off-white it isn't limited to Christmas.

I need to double check my neck width measurement in my chart and the relationship with the shoulder length measurment.  Looks like I changed one without changing the other and the software thinks my shoulders are wider than they are.  So not the perfect fit that I would like but definitely a better fit for me than rtw since the accurately located darts help add shaping and the top skims the body.

The picture was taken after I got home and had been sitting all evening in the poly gabardine pants -- so all in all a little rumpled .... but "it will do."

Sunday, December 13, 2009

Christmas Sewing -- part 1


I wanted to make something special for a few special friends and decided to use the jewelry bag pattern from my TCC software.  This was completely at default and when I make mine, I think I am also going to size it down to have a second, smaller bag for earrings only.

When open, this bag is 14" across and contains lots of little pockets to hold earrings, necklaces, bracelets ... whatever!


It also has a little padded bar that can hold your rings, hoop earrings, and bangle bracelets.

The fabric I used is great in person but havoc in the picture.  It is a brocade that is shiny satin on the right side and a lovely matte on the "wrong" side.  I used the matte for the outside of the bag and the top ruffle, and the lighter satin on the inside of the bag so it would be easier to see the pieces of jewelry. The matte side is one of my favorite shades of green (celedon) and the inside contrasts with a silver-ish white.

The first one I made at our April workshop is out of a floral cotton that is great to look at, but difficult to see the contents of my bag.  So I learned that the inside should be in light colors and a subdued print or solid color.

If you don't open the bag fully, you can set it on the dresser top and it acts as a nice little traveling jewelry box -- holding its shape while holding your treasures.  Here's another "aerial" view.


I didn't take time while I was making these to do step-by-step photos, but will try to do that with the one I make for myself.  I'd like to show all the cool tools and techniques I used in building the bags.  Meanwhile, all three of these have gone to good homes.


Monday, November 30, 2009

The Pocket Stylist

Thanksgiving has come and gone -- lots of good food and a great visit with my daughter. Seems like I just posted here and instead I see that it's been almost a month!

Didn't do much sewing but we did make a little coat for her new puppy, Louis (pronounced Louie).  He's only 5.5 pounds at 12 weeks so we didn't do much fitting and the fit is '"generous" since I know he will grow in the next 3 weeks until he comes back for a Christmas visit.


We used fleece and iron-on vinyl so that it would be somewhat weatherproof.  The pattern was a test from the TCC pet line and the "baby doll" measurement chart.  I guess the next one we attempt will have a hood ... we'll see ...

I have another book from the library, The Pocket Stylist by Kendall Farr.  She says several things that are so on target that I have to share.

"Fashion Misconception: Read-to-wear actually is ready to wear. In fact, an affordable perfect fit right off the rack is as impossible to find as a Hermes Birkin bag on sale."  

She also talks about "optical illusion versus delusion" -- boy do I like that phrase!

And this is why I like to use pattern-drafting software to generate my custom-fit patterns -- "What distinguishes good fit for any body at any size?  Clothing that skims the outline of your shape.  Nothing clings or pulls, nor is anything so oversized that it hides your body's natural outline." 

This is a good little book that goes on to talk about different body silhouettes and the design lines that look best on them.  The goal is to create an unbroken line -- and those lines "break" when you have poor fit -- eg pulling, bunching, sagging.

I'm starting to plan my sewing for a Puyallup expo wardrobe.  A few target patterns have been tentatively chosen but I still have to select the fabrics and decide on style lines and embellishments that will enhance rather than detract from the garment.  So more to come as I begin to shop the stash!

NAYY -- but here's a link for more on that book ...
http://www.amazon.com/Pocket-Stylist-Behind-Scenes-Expertise/dp/1592400418

Sunday, November 1, 2009

Preparing Fabrics, Cutting, and Marking

These topics are covered extensively in Chapters 4 & 5 of the Bishop textbook.

I know that it seems like the goal today is to do things better & faster ... but sometimes faster is not better if you skip these steps.

In fact, I think I take more time preparing my fabrics (prewashing, making sure the fabric is not pulling off the straight of grain), laying out the pattern (really watching that grainline!), and marking the pieces.

It really does cut down the construction time at the machine (not having to go back and look at the pattern for match marks) and affects the overall hang and fit of the garment.

Even when you have a pattern that fits, you can still do a lot to mess that up in the final result!

ok -- off that soapbox for now

anecdote -- I remember a time when I was a part of a group of 4 girls who needed matching dresses ... and we chose a pattern that would be floor length ... and fabric that was 1" gingham checks. Two of us were making our own dresses and two had a local seamstress do the sewing.

When I was laying out the pattern, my mom stopped me just before I cut the pieces and said that I needed to line up the rows of checks with the matching notch. I tried to argue with her that since it was checks it really didn't make any difference. HAH! You know I was wrong. She won and I unpinned and repinned, matched the notch, and then cut.

I was the only one who had beautifully matched chevrons at the side and front seams ... another lesson learned and remembered.

I've looked for a picture but can't find one -- and the dress has long ago gone to the Salvation Army donation bin.

Friday, October 30, 2009

The Bishop method

I've heard of "the Bishop method" and it has been mentioned on some of the sewing lists I read. So I decided I needed to get a copy of the book and see what it is all about.

In reading the history in the preface of the book (from inter-library loan) c1966, 1959 I have come to the conclusion that my mother was not taught the Bishop method but that she and Edna Bishop were probably kindred spirits.

Mom was mostly self-taught but she also worked for a time in a sewing factory as a sleeve setter (in either the 30s or the 40s).

I think I am going to enjoy this book because the Preface states:

The Bishop method embraces the following fundamental principles:
Grain perfection
Accuracy in preparing, cutting, and marking fabric
Perfection in stitching
Perfection in pressing

So this new adventure is off to a good start!

Tuesday, October 6, 2009

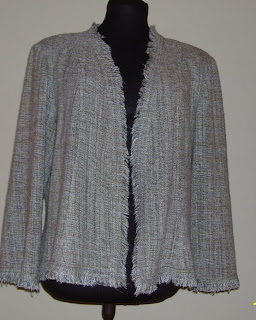
Fringed Jacket


I know you've all been wanting to see the jacket that ties this collection together.

The inspiration was threefold -- 1) the tweed fabric itself, 2) a Sewing with Nancy episode for a one-layer jacket ... no lining ... just what I needed since time was short, and 3) this fringed jacket that I saw on the internet (source: New York & Company)

I noticed on the inspiration jacket that they had sewn a trim around the fringe and knew that I'd need to do something too, to keep the fringed edging from raveling out the entire jacket.

My time was running short so I used the Shoulder Princess fitted jacket from The Complete Clothier and not only eliminated lining but also collar, cuffs, lapels, buttonholes, and hems!


I started designing the jacket at 4 pm on Tues, printed it by 5 and had a jacket when I went to bed around midnight. Did I mention that I was leaving for the sewing expo the next morning? Since I was doing the driving I knew there would be no working on the jacket en route!

Some things I did worked well -- I cut 5/8" strips of the lightest weight fusible interfacing that I could buy at JoAnn's. Then I fused those strips around all the seam allowances on the inside. Not only did that stabilize & control the cut edges, it also helped me to immediately remember which was the wrong side and which was the "right" side for this garment.

I sewed each princess seam first on the sewing machine ... pressed ... then serged the seam to clean up the cut edges ... pressed ... then did a row of topstitching on the right side to further stabilize the princess seams and make the seam lines a little more defined (even though the thread really blended into the tweed).

For the other seams -- shoulder, side, and sleeves -- I sewed the seams on the sewing machine, pressed open, and stitched over them with a multi-step zigzag to control raveling (although I could have used the serger there, too).

I realized that I could not just fringe the cut edges because none of the cut edges were on the straight of grain and would ravel unevenly. So I cut strips of fabric along the selvege for the cuffs (1"), front & neckline (1.5"), and hem (2") and stitched those to the jacket with the coverstitch machine. I figured the extra stitching would be a bonus in stopping the fraying and the double weight would be just what the edges needed.

That's what I like about sewing -- I saw my inspiration pic and the sewing program at about the same time ... and with TCC in less than 2 weeks I had one of my own ... to my specifications ... and my fit!


Wednesday, September 16, 2009

One More Outfit


the blouse just needs buttonholes, buttons, and hems ... this one will go with all three pairs of pants ...

I know you can't tell from this picture, but the blouse is a fitted silhouette and actually combines two TCC patterns and we call it the Classic Rev Hippie. My dress form just doesn't fill it out the way I do.

The front is the Classic blouse which has one side bust dart and one waist dart that I've extended all the way through the hem. The back (the rev -- for "reverse") is an empire with a skirt that has a center seam with some flare added. That seems to be the best fit for my body.

I had planned to make something with a collar but I really don't like wearing collars ... and I want to be comfortable, right? This is a soft challis (maybe rayon?) and I didn't think a collar would be a good design decision, even with interfacing.

Now ... off to design the jacket that will go with all three outfits .....


Monday, September 14, 2009

Two outfits


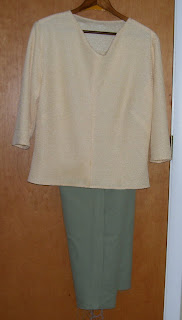
Here are pics of two outfits ... almost finished .... the pants need to be hemmed and pressed.

The tops would have looked better on the dress form but I wanted to show them with the coordinating pants.

The green is a TCC Twist Top and the yellow is a TCC cowl. Both are out of knits so will be user friendly for laundry and wearing.

Now, back to the cutting table to work on blouse #3.

Saturday, September 12, 2009

Pants! Pants!

Two pair of pants finished except for the hems ... not certain which shoes I'll wear so am going to hem those next week.

No pictures -- pants on a hanger is a pretty boring picture and I don't feel like posing for the camera today.

I used The Complete Clothier Fitted Pants Draped and made them almost at default except for using the ankle ease and leg shaping tool to get a straight leg.

Pair 1 is the medium brown herringbone with an invisible zipper in the side seam, and those went together with only having to recut the waistband once. I had one too many interruptions and didn't follow my dad's advice of measure twice cut once .... so I had to measure twice, cut twice -- lucky for me I had enough fabric.

Pair 2 is dark brown and almost had to be capris. There wasn't as much fabric as I thought I had but with some forethought was able to flip one pattern piece over and get them cut out of approx 1 2/3 yd of fabric, even allowing for the nap. Sewing was a bit challenging this morning. I had changed to a sharp microtex needle but after sewing all the darts and putting in the zipper 3 times I was not happy with the tension. First time I didn't interface the seam allowance. Second time I did interface the seam allowance. Third time I put paper under the seam.

SO ... after ripping the zipper again I took a look at the darts and wasn't happy with the tension there either ... out came the 8 darts. Next tried a universal needle size 12. Next tried a universal size 14. Finally with the size 14 tried adjusting the tension. VOILA! back in business. After that everything went together just fine. And I realized that the fabric was heavier than I first thought so they will be good all winter.

Now to cut out the green pants.

Monday, September 7, 2009

Fabrics for my SWAP


...that's Sewing with a Plan

My thought for southern Michigan the end of September was to make pants, short-sleeved tops/blouses, and jackets ... so if we have a hot week I won't roast and if the weather or the AC is cool, the jackets will take care of any chill. I may decide to make the sleeves 3/4 length but they will all be a basic straight sleeve since that is my favorite to wear.


Long story short -- I found lots of nice matches and can make do for the three days with three pairs of pants (dark brown, medium brown, and sage green), one jacket (tweed of dark brown, medium brown, sage green, off white, and a little aqua if you look really hard), and three blouses/tops. I found several fabrics for the tops so will make three for Novi and the rest for my fall wardrobe.


Outfit 1 is the jacket with dark brown pants and a light green twist top that will be worn with a light beige camisole.

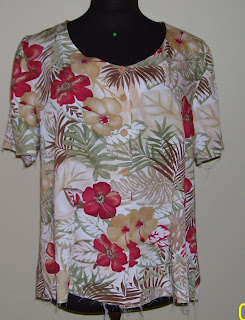
Outfit 2 is the jacket with medium brown pants with a tropical print (but fall colors) that will make a collared shirt.

Outfit 3 is the jacket with the sage green pants and a butter yellow textured knit that will be a cowl top.


Other tops are a satin with a fun print of cologne bottles that will be a ruched neckband blouse, a mossy green slinky for a pleated shoulder cowl top, and a couple other prints that I have pulled from the stash but haven't decided a pattern yet.


progress report -- the medium brown pants are cut out .... ready to sew ....


Sunday, September 6, 2009

Time to Post!

The title could mean a couple things ... both true ...

1. It is time for me to start posting here. I really fell short on my resolution to use this blog.
2. I need to find time to post. Taking the pictures, writing the copy ...


But since I last posted I've sewn a coordinated winter/spring wardrobe that I wore in the TCC booth at Puyallup, visited my son in Oregon, worked a TCC user workshop in Chicago, visited my daughter in Atlanta, tested lots of patterns, read more about sewing, mowed the yard too many times to count, worked on a lot of manuscript to earn money, attended two separate sewing expos in Cincinnati and lots of classes, joined ASG ... well then, I guess I have been busy!

I did manage to make & finish two real garments -- a pair of walking shorts and a t-shirt. Maybe some pictures of those next.

Now plans are in high tilt for the American Sewing Expo in Novi, Michigan the end of the month and I haven't started sewing yet! But I have shopped my stash for my fabric and managed to coordinate 3 solids for pants, 3 prints for tops, 3 solid knits for tops/cami, and a beautiful tweed for a jacket that will coordinate with all.


Friday, January 23, 2009

Apron!


Working on those resolutions!


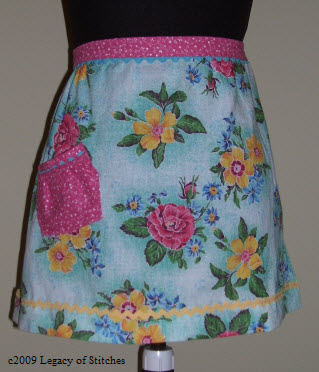
Here is the first apron that satisfied Resolutions #4 & #5.


It is a simple apron from TCC's Accents that I was testing and will take with me to Puyallup to display in our booth.

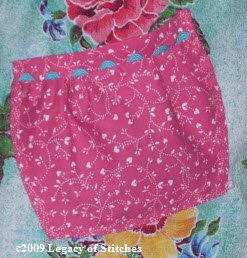
I added rickrack in the waistband seam and between pocket band and gathering and then again along the bottom of the apron. I also used a decorative stitch from my Janome 6600 (Mode 3, #66) that actually mimics the print of the pocket to attach the pocket and also to do the bottom stitching on the waistband.


The pocket is purposely put on a slant so that 1) I didn't have to align it to be perfect ... anything was correct and 2) it is easy to reach into with my right hand. It's a little pocket just for jewelry, rings; actually more for decoration than function since I rarely use pockets. The decorative stitch was also functional as well as pretty since I knew I would catch all the edges that needed to be caught w/o stressing over getting it "perfect."

A fun, functional garment for the kitchen!

Saturday, January 3, 2009

HAPPY NEW YEAR -- 2009!

Once I started to think of what my resolution for this year should be, I couldn't stop at just one. So here are the top five --

#5 Learn some new embellishment techniques

#4 Wear aprons -- this means sewing some funky ones that will put fun into function

#3 Play the piano once a day -- at least the keys will stay dusted

#2 Drink more water -- always a good idea

#1 Post regularly on this blog!


A quick story about #3 ... when I was a little girl in the late 1950s, we lived on a 100-acre farm in NW Ohio where my father grew wheat, oats, corn, and soy beans. Even though he also worked a night job, there wasn't much disposable income.

My mother wanted a piano ... so she had to be creative in finding the funds for such a luxury ... while deciding what to sacrifice to get it.

I don't remember the details of the transaction (I was about 5 at the time) but do know that one day some man came to our house with a piano and drove away in my parents' car. My mother had answered a newspaper ad where he had wanted to trade a used piano for a car. (Or, an "un-used" piano ... his children refused to practice...) A win-win solution since he got a car and we had a piano in our living room but still had the pickup truck for transportation and farm chores.

Mom was always singing, with or without the radio; now she had a piano and "our" formal music education began. She would sit at the back of the room during my piano lessons -- today I realize she was actually auditing and practicing and learning along with me. I was somewhat of a convenient means to her end.

I am sure that the car has many years ago gone to the "big parking lot in the sky," but I still have that piano and many memories which include more than piano lessons and recitals and practicing. In high school I was one of the accompanists for both the high school and church choirs and even gave piano lessons at a local music store my senior year.

Thanks, Mom, for knowing how to set priorities ... and giving me the gift of music ....