Monday, December 27, 2010

Canine Couture

Louis came for another holiday visit -- my how he has grown.  From 5.5 lbs last year to 11.4 lbs this year.  You can see the difference in the size of the water bottle!  (same brand)


Ohio had a little more snow and colder weather than he's used to in Georgia, so we decided it was time for a new coat.  Actually we have a couple more planned as well.  The first one is from McCalls 6218.  We shopped the stash and decided to use the same blue fleece from last year and paired it with a traditional woven plaid for the lining.


Once I started sewing it became clear that the blue fleece should be the lining to provide comfort and warmth -- and the plaid for the outside.  The blue fleece was better for the contrasting scarf.  Here's the finished coat.


Maybe I don't know how to measure dogs, but I thought his length is 14" and his girth is 16". I had measured around his belly and from the pattern envelope it would seem that the Large is the correct size.  It seems too big around, but we accommodated that by trying it on him and then deciding where to attach the velcro.

Tuesday, December 21, 2010

Exchange gift

'Tis the time of year when we need token gifts but want them to be nice.  The criteria for this exchange is that it can be handmade (or not), have a sewing-related theme (or not), but must be < $10.

I decided to make a simple little purse organizer--the tutorial was found here:  purse organizer tutorial

I happened to have some striped ultrasuede that looks a little like denim and includes a rainbow of colors.  Since I have no idea about who the recipient will be in this grab-bag exchange (other than it will be a female), I figured this would work.  Her favorite color has to be in there somewhere, right?

Then it meant digging in the stash for something to use as the lining.  I could have been conservative with a solid color but found some calico that was more fun.  The colors seemed to be echoed in each piece.


I used the dimensions of the original tutorial since again, I don't know whose handbag will become home to this organizer and I don't want it to be too big.

I didn't take pictures of it in process, but some things I did were to make sure that I pressed the seams open on my pressing buck before turning.  That helped to have a nice edge, especially on the ultrasuede. I used my stitch-in-the-ditch foot to make sure that the edgestitching was even and I used a size 16 denim needle.  Another thing was that I rounded the corners to make it easier to turn the ultrasuede and avoid any lumps.  I used a tape dispenser as my template to get a nice curve. 


I used the stitch that backstitches at the beginning and end of the row of stitching to make sure that the vertical "divider" stitches wouldn't some undone with use.


It can be rolled up like a jelly roll for a small purse, or it could be just be allowed to wrap around the entire perimeter for a larger purse. 

I think there will be a few more of these to come out of my sewing room this year ....

Saturday, December 18, 2010

More ruffles?

Yes more ruffles!  This is actually a knitted flounce.  You may remember that I made some of these last year.  Like those, this one is also a gift.


 The yarns are both very soft -- the main yarn is 70% soft acrylic/30% cotton (Bernat denimstyle; color 03117) and the trim "eyelash" type yarn is 100% polyester (Yarn Bee- Frosting; color is Polar Icing).  The combination made for a very soft boa.  I went looking for anything "blue" that I had in my yarn stash and these were the winning candidates:


The pattern was a little lacier than the one I used last year.  It starts off with 110 stitches and after 11 rows there are almost 900 stitches on the needle before binding off.  I think I like this one better. If you want to make one, the pattern is from Lion Brand Yarn -- just search on "potato chip scarf."

When worn, it curls up into itself, but here is a close up to show some of the detail:

Monday, September 27, 2010

What I don't want to sew again any time soon ...

 In no particular order ....

challis
chiffon
fabrics that right and wrong sides are "almost" identical
prints that are difficult to see markings
ruffles
ruches
gathers
wool (sewing-friendly fabric but it makes me itch)
drapery fabric


I know I will sew some of the above again, but not any time soon. 

Saturday, September 18, 2010

Deja vu? More of the same ...

... but, different, of course!

One last garment for the style show that will be worn by a dress form (but not the one in the picture).  It will be a dress form made to the same measurement chart used for the garment, so the next best thing to a human model.

 Now, the details --
  • Same -- fabric as two other garments
  • Same -- shoulder princess silhouette
  • Different -- blouse instead of a dress
  • Different -- closure ... button front instead of zippered back
  • Different -- collar ... this is a convertible
  • Different -- sleeve
  • Different -- addition of some pockets


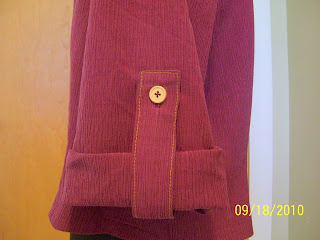
This fabric was a perfect candidate for the tabbed sleeve because it can be rolled up or ruched  and the inside of the sleeve looks like the outside.  I did sew the sleeve with a French seam so that the seam would be clean and as unobtrusive as possible.

rolled sleeve
ruched sleeve
I think either will be nice when there is an arm coming through the sleeve.  For the dress form, however, I would choose the rolled version.

One thing I'm still on the fence about is adding pockets to the front.  I made a couple small ones that have a pleat and topstitching.  The topstitching echoes that on the sleeve tab and complements the contrasting buttons. 

Sorry for the color -- the pic was dark and when I lightened it to show the detail, the color went funky.

This is a pocket with a pleat where I topstiched the edges of the pleat and put on a top band that used the crossgrain wrinkle of the fabric.

I kept the pockets small since they are more for accent than function, although big enough for a hankie (boy, that word dates me!) or some pocket change.

I don't want them up at the bustline but had thought maybe at the hemline, aligning the pleat detailing with the underlying princess seamline of the blouse.


with pockets pinned on         


    I'll think more about the pockets and then can always be sewn on later.  I just would not want to have to frogstitch them off.


    Tuesday, September 14, 2010

    Scarlett, eat your heart out!

    Scarlett O'Hara may have had green velvet ... but did she have bead trim?

    This is my last (hopefully) garment for the style show; there is possibility of one more but I am hoping that that one is canceled.

    The particulars -- a TCC sheath dress with an envelope collar and a loose sleeve shortened to just above the elbow.


    Some techniques I learned with this dress --

    • how to cut continuous bias strips
    • how to make piping
    • how to sew on beaded trim


    Some other things I learned with this dress --

    • It probably is NOT a good idea to use home dec fabric (ie drapery fabric) for a garment -- no matter how it turned out for Scarlett.  I used a whole bottle of Fray Check around the cut edges before I even started to work with the fabric.  I was afraid that even the serger couldn't tame runaway ravels.
    • It probably is NOT a good idea to cut drapery fabric on the crossgrain just to get the slubs to run vertically in the garment.  Also, NOT a wise idea to cut the collar on the the straight of grain just to get the slubs to run horizontally.  It just seems right to have the the lines moving those directions -- but I fear for the drape (no pun intended) of the garment.  
    • A hem that has been cut on the crossgrain is going to need to be sewn by hand.  Trying to use the machine makes for ripples and ridges that should only be in potato chips.
    The best thing I learned is either that I can tackle and conquer some ambitious tasks ... or .... how good it feels to be finished.

    Right now, I have to say it feels GREAT to be finished.  When I rest up a bit I will put on my own garments so I can post those pics.

    Saturday, September 11, 2010

    The same ..yet different


    Today's title reminds me of when as a little girl I'd try to tell my dad that things were "exactly the same ... but different" .... amusing to him yet it made perfect sense to me!


    These two dresses for the TCC style show at Novi are both in a crinkle woven that actually sewed like a dream.  Same.   The pattern for each is the shoulder princess dress.  Same.   The collar and neckline on Dress 1 is a lowered jewel with a turtleneck on steroids; Dress 2 has a v-neck with a convertible collar.  Different.  The sleeve on Dress 1 is a shirt sleeve that has been widened and lengthened at the wrist to add fullness that is contained with a cuff; the sleeve on Dress 2 is a skirted tiered sleeve with some "princess" seaming.  Different.  The dresses are made from two distinct measurement charts.  Different.

    Dress 1


    Dress 2
    The skirted tiered sleeve is one of my favorites.  Once this sleeve was chosen, the sleeve tool allowed me to shorten the overall length and make other preference changes.  Then I had a dilemma -- did I want to cut all the sleeve pieces on grain or did I want to do some on the cross grain?  I tried both ways and still had a dilemma -- I liked them both and each had pros and cons.

    Sleeve A:  The one where all the pieces were on grain.  Pros were that it sewed together a little easier (because of the crinkles) and hangs ever so gracefully. Cons are that you can't really see the panels since the seamlines hide in the crinkles.

    Sleeve B:  The one with every-other piece on straight or cross grain.  Pros were that you can see the panels and it still hangs beautifully.  The only con I could think of is that some may think I made a mistake (gasp!) when laying out and cutting the pieces.

    A: On-grain pieces


    So while I am a stickler for accurate details, I am not afraid to 'fess up when I've goofed.  In this case, it was intentional and not a goof.

    B: Some cross-grain pieces


    And the winner is --

    So, see?  The same ... yet different.

    Wednesday, September 8, 2010

    Under the Tuscan Sun

    Been sewing like mad and have a few more garments finished .. just need to take some pictures and get them posted.  Here's a quick project that I finished this afternoon --

    I wanted a new pair of pjs that I could take to Novi that didn't look like they had come out of the rag bag.  So  Saturday I looked at t-shirts at WalMart and found one in a pale orange on the clearance rack.. 

    I have lots of flannel in my stash with cute prints but thought maybe a nice cotton would be better for this time of year, especially since I wanted a pair that would hit mid-calf.  At JoAnn's Labor Day sale I checked the clearance tables and found a cute Debbie Mumm print with a Tuscany theme in just the right colors and then found some cute ribbon also on clearance.  (Do you get the idea I that I love a bargain?)


    The shirt was $3 and the pants cost $5.79 if you don't count elastic or thread from my stash (and who counts the stash anyway????)   

    So this is my "fun" sewing ... still have 2 style show garments and 4.5 booth garments (what I will wear) to finish and am watching the calendar days fly by -- 9 sewing days left --  at least I'm not counting the hours just yet. I've completed 20.5 items  counting the pjs so am still breathing and not hyperventilating just yet.  I'll be posting some new pictures soon.


    Publish Post

    Wednesday, September 1, 2010

    All buttoned up

    Here she is ... ready for her appearance at Novi ....  pretty good fit for a gal with only half a torso and no arms!


    It was a little tricky taking her measurements but the pattern was not altered and as you can see, no pins, clamps, or clips in the back of the blouse.


    I did built a little ease into the blouse as if she were a real person, just so it wouldn't be too difficult to button the buttons.  Plus, showing a skin-tight fit wasn't exactly my objective.

    Sunday, August 22, 2010

    Button, Button .... WHICH button???????

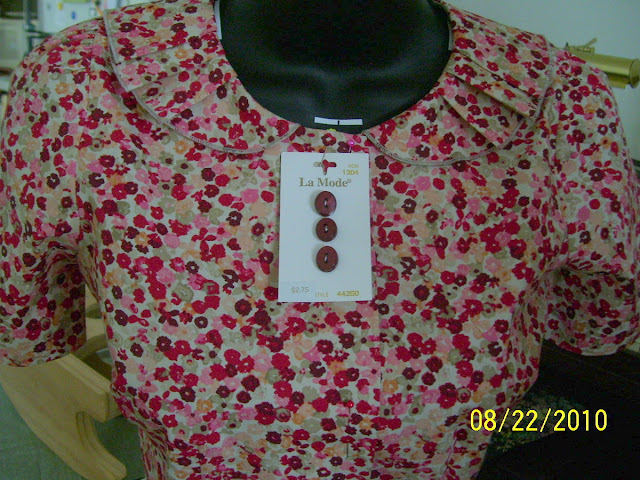
    Another garment for the style show almost finished -- but I can't decide which buttons to use ....

    On one hand I like the scale, color match, and feminity of this one

    Click photo to enlarge

    On the other hand, my original thought was to use taupe to coordinate with the rolled hem that I put on the edge of the collar ...

    Click photo to enlarge

    Sometimes decisions are the most difficult part of sewing!  

    Please leave a comment to voice your opinion ... otherwise I'll have to flip a coin.

    Saturday, August 21, 2010

    the Good, the Bad, and the .....

    FINISHED!  Another outfit for the style show!

    The GOOD
    • 3 more garments are checked off as DONE!  (actually 4 since I made a half slip to go under the skirt)
    • challis -- beautiful drape, lovely ruffles
    • chiffon -- beautiful drape, great as a wrap
    • colors -- luv em!
    • a rotary cutter, a ruffler, and a serger -- lifesavers
    The BAD
    •  challis -- lovely to wear but not as much fun to cut --garment pieces weren't too bad, but for stability I pinned the fabric to tissue paper before cutting strips for the ruffles
    • chiffon -- lovely to wear but NO fun to cut -- again, more tissue paper used to stabilize the fabric even after I had given it a hefty dose of heavy duty spray starch and pressing (tip: cover the ironing board cover first with an old towel)
    • 222" of ruffle -- need I say more? (that's 18.5 feet or 6.167 yards)
    • print -- a one-way print so had to make sure the tulips were used so they are supported by their stems and not hanging from them
    • fabrics that look "almost" the same on the right/wrong, fashion/reverse sides ... close enough to get them mixed up, different enough that every seam was checked twice before stitching
    • 45" fabric -- could only get one cardiwrap front out at one cutting so more work to stabilize and keep it all from dragging off the cutting table
     The FINISHED  (one of the most "beautiful" words in the language)

    A sleeveless shell, a gathered skirt with a shaped hemline and 5" ruffle at a 3:1 ratio and rolled hemline (both top and bottom of the ruffle), and a cardiwrap with a shell edging.


    There are a couple options for wearing this cardiwrap, I think our model will probably tie the front.

    I should have pressed this again before taking the pictures but promise to do so before the style show.

    Monday, August 9, 2010

    Remember the tune to "Age of Aquarius"?

    Oh flash back to the late 60s!  I was in the grocery this morning, buying some goodies for a gourmet breakfast for my son who is 21 today.  I decided to adapt an asparagus-Gruyere cheese quiche that I had at the BonBonerie the other day as scrambled eggs instead.

    As I was walking through the produce section thinking -- asparagus -- asparagus -- I realized that the piped-in music was playing the Age of Aquarius ... how timely ... start humming now ... so of course, in my head it became


    This is the dawning of the Age of Asparagus
    The Age of Asparagus
    A-spar-a-gus! A-spar-a-gus!

     Oh yes, I know it -- I am such a dork!  But it made me smile ....

    Click here if you don't know the tune  (not sure if it will play enough -- you get to listen once)

    The eggs were great along with a little rosemary focaccia and a side of goetta (a Cincinnati treat, pronounced, getta) which is a sausage-like meat that has pin oats as part of the mix. http://www.goetta.com/

    Pluse we have enough extra to have roasted asparagus later today, his favorite veggie.

    The end of an era for me -- the last of my babies to turn 21!  Next milestone is when he finishes that college degree ...

    Sunday, August 8, 2010

    Finally -- something for ME!

    Today I took a break from my style show sewing and decided to make a pair of capris that have been on the "to do" list since early June.  I figure that I'll still have time to get plenty of wear from these before I have to put on socks and real shoes instead of my preferred bare feet or sandals.

    Last week I went to a wonderful lunch at a great little tearoom and noticed a woman wearing a pair of capris with an interesting back hem treatment.  So today I am now wearing a pair with that same detail!  The center back had a vent and it looked like it was two flaps that had been sewn to the pant leg above.


    So this morning I took my capri pattern and arbitrarily decided how long my flap would be.  Not too scientific -- my TCC pattern had printed so that I had a page break just shy of 4" -- so that became my flap.  I cut some new seam lines and added seam allowance with some tissue saved from Christmas gifts. 


    I prefer 3/8" seams because that is just the width of my standard presser foot.


    I had decided to completely self face the flaps.  They were sewn together with a seam at the center back and the hemline.  I finished the top edge and side seams with the serger.


    I understitched the seam at center back so that it will remain (said hopefully) nice and crisp through many washings and wearings.
    Once I stitched them to the bottom of the pants leg, I added some top stitching for reinforcement and visual interest.Funny how the flash so totally changed the color of the fabric in the one shot.  
     

    I think it took as long to finish the hem, sew on the waistband hook, take the pictures, and write this post as it did to sew the pants! 

    And now for the best part -- the fit ... they are sooo comfortable when they fit well.


    Thursday, August 5, 2010

    It's NOT the pits ... it's the air!

    When I'm not sewing or working on the computer, I'm usually cooking.  I just have to share this great discovery ....

    Yesterday I made some guacamole out of an avocado that was at just the perfect degree of ripeness ... and the guacamole was soooo good ..l but I couldn't eat it all.  I've always heard that if you put the avocado pit in the guac it will keep it from turning brown.  I also used freshly squeezed lime juice from half a lime so the citrus will help with that too (not to mention the flavor!)

    Based on something I had discovered (or read somewhere, been doing it so long I don't remember) that I do to keep ice cream fresh (ie no ice crystals or turning gummy), I decided to put some plastic wrap over the guacamole and put it into the refrigerator to try to save it to eat today.

    When I opened the refrigerator this morning to make breakfast, here's what my bowl of guacamole looked like (about 12 hours after I first made it) --


    Nice and green ... not brown at all!  You see the secret is not the plastic wrap itself, but to put it directly on the guacamole and not across the top of the bowl.  It kept out all the air.  It may be a little messy when I take it off but that's better than wasting all that good yummyness (or is it yumminess?)  If you notice, I purposely left out the pit to test my method.

    Bon appetit!  I guess it would be more appropriate to say ¡buen provecho

    Tuesday, August 3, 2010

    What not to wear ...

    ... when sewing eyelash sparkle knit? 

    .... duh ... black pants .... ask me how I know?

    It's fun sewing a cardiwrap for a little girl -- especially if it can be cut from only a half yard of fabric (she's 4).

    Here is the little cardiwrap that I stabilized the shoulders and back neckline with fusible bias stay tape (I used Design Plus) and then the shell stitch to finish the edges and hemlines.  The edging really gets lost with the eyelash so it was more a matter of just having a stable finish.


    I don't know which is more challenging -- sewing the small garments or trying to figure out how to photograph them.  They don't fit on the dress form so we'll just have to be content with hanger and use our imaginations to put them on a little cutie pie.


    Now, where is my lint brush?


    Oooh la la

    Yesterday was a double-edged sword ... working on an editing project that took all day and then some ... 11.5 hours at the computer but that will help this month's invoicing.  So today it felt so good to be able to stitch up a couple of quick garments for the TCC style show at Novi .  Two more off my To Do list as Done!

    I worked on the little girl's sleeveless shell and her wool skirt.  Doesn't everyone else work with wool on a 90-degree August day?  Makes you have empathy for the sheep.


    The skirt design wasn't my idea and I was given the task of putting a 2:1 ruffle on the bottom.  No big deal but I wasn't so sure how that would work with the wool--it came out just fine. First I serge finished the top of the ruffle that would be sewn to the skirt and then I did a serger rolled hem (3 thread) with just plain old serger thread on the bottom of the ruffle.  Next I went back to the sewing machine to play with my new ruffler and used the pleating setting.


    Lucky for me that the width of the fabric worked out to be "almost" perfect for the size of the skirt to do the ruffle with no seaming.  Fortunately I left enough thread at both ends of the ruffle so I could work it out just a little bit (about 2") so that it matched the skirt perfectly.

    Now I don't know about you, but I can't wear wool.  Even blends.  So I decided this skirt should have a lining (I actually put in an underlining which I thought was quicker).  Every girl needs a few secrets that make her smile -- and the lining of this skirt is one of those.  I hope the little girl who is getting this skirt will smile whenever she gets dressed.  I just hope her mom doesn't have to convince her she can't wear it inside out!


    I serged the underlining to the wool at the bottom seamline and then added the pleated ruffle.  It was just too much for me to try to do all that in only one step.

    The outfit has one more piece coming -- a fun little cardiwrap -- so something to look forward to!

    Sunday, July 25, 2010

    Definitely making progress

    The skirt is finished .... and it looks deceptively easy ...  with the help of the serger (rolled hem on a 146" ruffle), ruffler (a 2:1 ratio of ruffle to skirt circumference, invisible zipper foot, stitch in the ditch foot  (topstitching/edgestitching on the waistband), and the sensor buttonhole foot.

    Loving my Janome today!


    Here are the three pieces put together