This week was the Cincinnati sewing expo and even though you would think there would be nothing I could possible need (especially if you looked at my sewing room) there were a couple things I need as I do those style show garments.
Two of the skirts will have ruffles at the hemline, another will have ruched vertical strips, and yet another will have a pleated "ruffle" at the hemline. That's lots of gathering ... not my favorite activity.
So taking advantage of an expo special at my favorite sewing store (Kramer's/Montgomery) I got the ruffler attachment for my Janome 6600P.
So far I've had fun playing with fabric strips and now will not dread those miles and miles (I know it will feel that way) of ruffles.
Saturday, June 26, 2010


Saturday, June 19, 2010
What a week! Style show planning
Sorry no pictures -- yet --
I just returned home from a SEAM Team work week at the TCC home office in the Chicago area. We were working on planning for a style show at this year's American Sewing Expo in Novi, Michigan.
We have been bumped up from a half hour show to an hour! There are seven volunteer models who have promised to keep their measurements stable and we have around 90 garments/items (some are purses) planned with 6 of us doing the sewing.

We have measurement charts for all and skimmers (fitting garments) have been proven out. This week we planned the garments, printed many of the patterns, and did our fabric shopping. First we decided a focus for every round (there are 12), then assigned models to the rounds, chose garments, and finally paired fabric with the patterns. Not only do the fabrics need to complement the models' complexions (most are Autumns) but they need to also complement the other garments in the round. Somehow we think we have a good working plan.
I came home with patterns to tape, bags of gorgeous fabrics, and a mission of 18 garments for my share. Add to that some personal garments to wear for the 3 days of working in our booth in the vendors mall. Why does September 20 (my deadline for ALL garment construction) sound so far and yet so soon?
 That's roughly a finished garment every three days if you figure in everything else that comes with summer --esp mowing and weeding -- plus regular work on editing & QC projects, TCC user group meetings, ASG meetings, and two sewing expos coming to Cincinnati where I can take classes. YIKES!
.... more to come ... I'll try to post my progress and give you a sneak peek with a behind-the-scenes look at organized chaos .....
... now to have my morning coffee and it's off to my TCC users' group meeting to show them all my swatches!
I just returned home from a SEAM Team work week at the TCC home office in the Chicago area. We were working on planning for a style show at this year's American Sewing Expo in Novi, Michigan.
We have been bumped up from a half hour show to an hour! There are seven volunteer models who have promised to keep their measurements stable and we have around 90 garments/items (some are purses) planned with 6 of us doing the sewing.

We have measurement charts for all and skimmers (fitting garments) have been proven out. This week we planned the garments, printed many of the patterns, and did our fabric shopping. First we decided a focus for every round (there are 12), then assigned models to the rounds, chose garments, and finally paired fabric with the patterns. Not only do the fabrics need to complement the models' complexions (most are Autumns) but they need to also complement the other garments in the round. Somehow we think we have a good working plan.
I came home with patterns to tape, bags of gorgeous fabrics, and a mission of 18 garments for my share. Add to that some personal garments to wear for the 3 days of working in our booth in the vendors mall. Why does September 20 (my deadline for ALL garment construction) sound so far and yet so soon?

.... more to come ... I'll try to post my progress and give you a sneak peek with a behind-the-scenes look at organized chaos .....
... now to have my morning coffee and it's off to my TCC users' group meeting to show them all my swatches!
Tuesday, June 8, 2010
Bling! Bling!
Summer sewing is so much more fun than winter sewing!

The latest project started with an inspiration from a Butterick pattern (5499) -- the turquoise tunic with V hemline. But I know I'd need a lot of alterations -- the necklines are always too big/low for me and the hips are always too tight.

 So I decided to use my TCC software and started with the darted tunic that is drafted with an FBA. Using the tools, I changed the neckline to my comfort zone and created a V'd hemline.
 Then I went "shopping" in my fabric stash. I found a piece of batik print fabric that I bought for my daughter about 20 years ago (remember Piece Goods fabric shops?) It was meant to be a pair of shorts and a top but she didn't like it -- so it got stuffed into the stash. Happily it survived the prewashing and moved on to the next step -- cutting.
The batik motif is a triangle and it clearly has a large plaid in the background. Here's a pic of it hung over the shower curtain rod. So I knew that 1) I wanted as few match points as possible -- eg no sleeves and 2) it was a directional print because the triangles would point either up or down. I chose to have them point down because as a "A" or pear-shaped body I want the eye to be fooled into thinking broader at the shoulders and narrower at the hips. (Ok, so the eye still knows I am a pear ...) I also wanted to mirror the V neckline and V hem and not oppose it. As it turned out -- there was not enough fabric to cut sleeves if I had wanted them. I had to creatively cut the facings on the crosswise grain and even had to seam the CB of the back facing.
Some other decisions I made -- I faced the hemline since I sure didn't want to try to miter that CF & CB point and I also wanted to give a bit of weight & stability to the bottom hemline by having a nice, straight seam. I cut all-in-one facings for the neck and armhole to make for a smoother fit inside the garment. If any of you have seen Louise Cutting's videos or guest appearances on America Sews with Sue Hausmann -- she says to press those seams open first and then together when you turn the facing. DO IT! She is so right -- it takes a little more time in construction but you'll be happier with the finished edge.
Almost finished -- it was too plain so I topstitched the facings with a teal thread to pick up the color in that stripe. Using all purpose thread, I topstitched with the triple stretch stitch on my Janome 6600 using the dual feed (walking) foot so that my layers wouldn't shift. I had created a 3" hem facing so topstitched at 2.5" and the neckline was topstitched at 1". I marked my stitching line with a soap sliver that I had commandeered from the shower and stowed in my sewing room for just this purpose. Done! Bonus: the tunic smelled Irish Spring fresh. I did rinse and dry the garment to get the soap out before I pressed again since I wasn't sure what the heat would do and didn't want any "oh no" surprises.


So why is the post entitled "Bling! Bling!" you ask? I happened to do some snoop shopping at a local Stein Mart (don't you just love their boutique items?) and saw some gorgeous tunics in a variety of fabrics/colors/prints ... with one commonality ... beads & sequins to jazz it up. I decided that was what I needed, too, so a stop on the way home at JoAnn's yielded some seed beads in an iridescent magenta but no sequins. Right next door is Michael's and I found a pack of sequins that was multicolored with several of what I needed -- tuquoise, teal, gold, pink, magenta, and purple. (Iridescent turquoise would have been perfect but alas, not to be found). Off to home to spice things up!
Then more decisions -- what to use, where -- and I decided to do the center dots in the triangle motif and to let the fabric choose the sequin to use, coordinating with that part of the print. As I began to work the neckline, I was inspired to bling a V section to mirror the neckline. Then I decided to embellish the hemline within the topstitched area but to put a bead/sequin pair at each corner of each triangle plus the center dot to have a higher concentration of sparkle at the hemline.
I can't believe how long it took to get all those stitched on -- but what better way to spend an evening? And I love the look. Hope to get some good pics in better lighting then that will really show off the sequins.

Next is to cut & sew a pair of capris out of some bright turquoise twill to make this outfit "pop!"

The latest project started with an inspiration from a Butterick pattern (5499) -- the turquoise tunic with V hemline. But I know I'd need a lot of alterations -- the necklines are always too big/low for me and the hips are always too tight.

 So I decided to use my TCC software and started with the darted tunic that is drafted with an FBA. Using the tools, I changed the neckline to my comfort zone and created a V'd hemline.
The batik motif is a triangle and it clearly has a large plaid in the background. Here's a pic of it hung over the shower curtain rod. So I knew that 1) I wanted as few match points as possible -- eg no sleeves and 2) it was a directional print because the triangles would point either up or down. I chose to have them point down because as a "A" or pear-shaped body I want the eye to be fooled into thinking broader at the shoulders and narrower at the hips. (Ok, so the eye still knows I am a pear ...) I also wanted to mirror the V neckline and V hem and not oppose it. As it turned out -- there was not enough fabric to cut sleeves if I had wanted them. I had to creatively cut the facings on the crosswise grain and even had to seam the CB of the back facing.
Some other decisions I made -- I faced the hemline since I sure didn't want to try to miter that CF & CB point and I also wanted to give a bit of weight & stability to the bottom hemline by having a nice, straight seam. I cut all-in-one facings for the neck and armhole to make for a smoother fit inside the garment. If any of you have seen Louise Cutting's videos or guest appearances on America Sews with Sue Hausmann -- she says to press those seams open first and then together when you turn the facing. DO IT! She is so right -- it takes a little more time in construction but you'll be happier with the finished edge.
Almost finished -- it was too plain so I topstitched the facings with a teal thread to pick up the color in that stripe. Using all purpose thread, I topstitched with the triple stretch stitch on my Janome 6600 using the dual feed (walking) foot so that my layers wouldn't shift. I had created a 3" hem facing so topstitched at 2.5" and the neckline was topstitched at 1". I marked my stitching line with a soap sliver that I had commandeered from the shower and stowed in my sewing room for just this purpose. Done! Bonus: the tunic smelled Irish Spring fresh. I did rinse and dry the garment to get the soap out before I pressed again since I wasn't sure what the heat would do and didn't want any "oh no" surprises.


So why is the post entitled "Bling! Bling!" you ask? I happened to do some snoop shopping at a local Stein Mart (don't you just love their boutique items?) and saw some gorgeous tunics in a variety of fabrics/colors/prints ... with one commonality ... beads & sequins to jazz it up. I decided that was what I needed, too, so a stop on the way home at JoAnn's yielded some seed beads in an iridescent magenta but no sequins. Right next door is Michael's and I found a pack of sequins that was multicolored with several of what I needed -- tuquoise, teal, gold, pink, magenta, and purple. (Iridescent turquoise would have been perfect but alas, not to be found). Off to home to spice things up!
Then more decisions -- what to use, where -- and I decided to do the center dots in the triangle motif and to let the fabric choose the sequin to use, coordinating with that part of the print. As I began to work the neckline, I was inspired to bling a V section to mirror the neckline. Then I decided to embellish the hemline within the topstitched area but to put a bead/sequin pair at each corner of each triangle plus the center dot to have a higher concentration of sparkle at the hemline.
I can't believe how long it took to get all those stitched on -- but what better way to spend an evening? And I love the look. Hope to get some good pics in better lighting then that will really show off the sequins.

Next is to cut & sew a pair of capris out of some bright turquoise twill to make this outfit "pop!"
Monday, May 31, 2010
Obsessing
Obsessing -- over fit -- over measurements -- over a quarter of inch here, quarter of an inch there ....
I've been working on some summer items for my wardrobe and feel very, very happy when I look at items in the mirror. Then I take a pic ... and instead of that being short for "picture" I think it is short for "picky, picky, picky!"
I have very comfortable pants and know that without my being a mannequin who has perfect measurements, perfect muscle (?) tone, and perfect posture ... I am not going to have a fit that appears "perfect." Heck, even the mannequins use clips and pins in some probably very uncomfortable places. My head knows that but still I keep trying to improve.
So for now I think I really am definitely at a "good enough to be seen in public" stage. And better than most that seem to be ahead of me in line at the grocery and other places where I have time to check out others' fit.

Those are pics of my test pair of capris -- the fabric is a bit lighter weight than I would normally choose but good enough for around the house. They are pretty much at default from my TCC software.
Here is a fun summer skirt (just a little straight skirt) that I made from some printed denim. I read that patterned (esp floral prints) are in for pants this summer. I wasn't quite ready for that so decided to start with a little straight skirt and work my way to pants.
(I'm trying to get the next two pics to appear side by side ... )
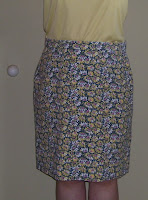

The cool thing about the software is that if my measurements do change, I can change my measurement chart and print out a new pattern. The skirt is great because my floor to waist measurements are taken at the back, side, and front -- so the skirt pattern is printed to be longer in the back, shorter in the front and then my hem is automatically level. You can also see that the back pattern better accommodates my, uh "assets."
 So that's it for today. Happy Memorial Day -- with a Thank You to everyone who has served in the military (my dad was a WWII Army vet, wounded in the Battle of the Bulge) or is currently serving. God bless you!
I've been working on some summer items for my wardrobe and feel very, very happy when I look at items in the mirror. Then I take a pic ... and instead of that being short for "picture" I think it is short for "picky, picky, picky!"
I have very comfortable pants and know that without my being a mannequin who has perfect measurements, perfect muscle (?) tone, and perfect posture ... I am not going to have a fit that appears "perfect." Heck, even the mannequins use clips and pins in some probably very uncomfortable places. My head knows that but still I keep trying to improve.
So for now I think I really am definitely at a "good enough to be seen in public" stage. And better than most that seem to be ahead of me in line at the grocery and other places where I have time to check out others' fit.

Those are pics of my test pair of capris -- the fabric is a bit lighter weight than I would normally choose but good enough for around the house. They are pretty much at default from my TCC software.
Here is a fun summer skirt (just a little straight skirt) that I made from some printed denim. I read that patterned (esp floral prints) are in for pants this summer. I wasn't quite ready for that so decided to start with a little straight skirt and work my way to pants.
(I'm trying to get the next two pics to appear side by side ... )


The cool thing about the software is that if my measurements do change, I can change my measurement chart and print out a new pattern. The skirt is great because my floor to waist measurements are taken at the back, side, and front -- so the skirt pattern is printed to be longer in the back, shorter in the front and then my hem is automatically level. You can also see that the back pattern better accommodates my, uh "assets."

Thursday, May 6, 2010
Spring Sewing
The calendar can't have already moved into May--my last post was in March!
The expo in Puyallup was great fun and time since then has been spent with spring yardwork -- WHERE do these weeds come from? I get the flower bed all cleaned up and after the next rain there is a whole new crop! To be fair, many are volunteer morning glory plants that I have decided not to cultivate this year so they are being pulled out.
In April I traveled to the Chicago area for a TCC User Workshop and that was another fun week. We worked on pants for a variety of body types and a blouse challenge using the software to design different elements of a yoked blouse to add personal touches.
Other than test garment sewing, I've only made one "out of the house" garment -- a Shoulder Princess Surplice top. I had the fabric in my stash from a Hancock's sale -- the only reason I bought it was the print included faux writing so it would seem more like a RTW than some of the other t-shirt knits that are available.
It's out of my normal spring palette (turquoise/green/yellow/coral/brown) but is perfect with jeans. And I just happened to have the PERFECT orange to use as trim to make the front "pop." The problems started when I went to lay out the pattern. Even though it is a t-shirt knit, it didn't play nicely when folded -- I couldn't get it to lie smoothly on the table. I even prewashed it twice and used fabric softener in the second wash. (I know we're advised against fabric softener until after the garment is sewn, but I was trying everything.)
That worried me -- if it wanted fight itself on the cutting table, what would it do in the garment? But you see, I had already been seduced by the perfect color match and just HAD to have it to go with my jeans. I decided I would line just the front panels with something smooth and found some flesh tone lining in the stash. Yes, I knew I was living dangerously by pairing a woven lining with a knit garment -- but hey, just the front panel, right?

I'm not totatlly satisfied with the result, but all in all, it makes a good casual top. I have the full length sleeves pushed up in the pic because that is what I do with them anyway! I didn't know if I would want long sleeves since Chicago in April is not as warm as Cincinnati in April.
I will use this pattern again, without the lining, and with short sleeves for summer.
Oh -- I didn't tell you where I got the orange fabric for trim -- a purchased t-shirt when they were sale at Michael's 2/$5. I buy the XXL size and cut them down for regular tees, but using with my TCC pattern that has an appropriate bust dart. That way I have matching ribbing and fabric, all for $2.50. Of course the quality of that knit isn't the greatest but it gets the job done. This ribbing for teh surplice was just strips of fabric cut off the bottom of the shirt. Since I don't see myself in an all orange shirt, I have lots of trim to harvest for other garments.
So I'm doing my part to sew green ... er, orange .... you know what I mean! Reuse, recycle, repurpose!
The expo in Puyallup was great fun and time since then has been spent with spring yardwork -- WHERE do these weeds come from? I get the flower bed all cleaned up and after the next rain there is a whole new crop! To be fair, many are volunteer morning glory plants that I have decided not to cultivate this year so they are being pulled out.
In April I traveled to the Chicago area for a TCC User Workshop and that was another fun week. We worked on pants for a variety of body types and a blouse challenge using the software to design different elements of a yoked blouse to add personal touches.
Other than test garment sewing, I've only made one "out of the house" garment -- a Shoulder Princess Surplice top. I had the fabric in my stash from a Hancock's sale -- the only reason I bought it was the print included faux writing so it would seem more like a RTW than some of the other t-shirt knits that are available.
It's out of my normal spring palette (turquoise/green/yellow/coral/brown) but is perfect with jeans. And I just happened to have the PERFECT orange to use as trim to make the front "pop." The problems started when I went to lay out the pattern. Even though it is a t-shirt knit, it didn't play nicely when folded -- I couldn't get it to lie smoothly on the table. I even prewashed it twice and used fabric softener in the second wash. (I know we're advised against fabric softener until after the garment is sewn, but I was trying everything.)
That worried me -- if it wanted fight itself on the cutting table, what would it do in the garment? But you see, I had already been seduced by the perfect color match and just HAD to have it to go with my jeans. I decided I would line just the front panels with something smooth and found some flesh tone lining in the stash. Yes, I knew I was living dangerously by pairing a woven lining with a knit garment -- but hey, just the front panel, right?

I'm not totatlly satisfied with the result, but all in all, it makes a good casual top. I have the full length sleeves pushed up in the pic because that is what I do with them anyway! I didn't know if I would want long sleeves since Chicago in April is not as warm as Cincinnati in April.
I will use this pattern again, without the lining, and with short sleeves for summer.
Oh -- I didn't tell you where I got the orange fabric for trim -- a purchased t-shirt when they were sale at Michael's 2/$5. I buy the XXL size and cut them down for regular tees, but using with my TCC pattern that has an appropriate bust dart. That way I have matching ribbing and fabric, all for $2.50. Of course the quality of that knit isn't the greatest but it gets the job done. This ribbing for teh surplice was just strips of fabric cut off the bottom of the shirt. Since I don't see myself in an all orange shirt, I have lots of trim to harvest for other garments.
So I'm doing my part to sew green ... er, orange .... you know what I mean! Reuse, recycle, repurpose!
Tuesday, March 9, 2010
Puyallup Sewing
It was a busy February -- sewing some new outfits to wear at the Sewing Expo held in Puyallup, WA (near Seattle).
I decided to use two of my outfits from the Novi show in September and made a couple new things -- three t-shirts, one a remake of a rtw tee and the others something from the stash; a knit camisole to wear under my twist top; a new blouse and picket skirt; and a pair of denim pants that has flat felled side seams to simulate jeans (so they are more of a trouser jean).


The days were long (show hours 8:30 am to 6 pm Thurs, Fri, Sat and Sun ran "only" til 5 pm). We were tired at the end of every day but enjoyed talking with all the people who stopped by the booth, The Complete Clothier.
The green t-shirt was worn on the trip out and the paisley t-shirt was worn on set-up day. On show days I wore my Novi green twist top/brown cami/brown fitted pants, Novi tweed jacket/yellow cowl top/green fitted pants; new blouse & skirt; and the t-shirt/"jeans" on Sunday.
Sunday's theme at the expo was Red-Pink day -- Red for women's heart health and Pink for breast cancer awareness. Neither are colors I wear often but had the wild t-shirt knit in the stash that also has some teal and goldish orange in the print. The print picked up the "jeans thread" topstitching I did on the side seams so that became my Sunday outfit even though the jeans were originally planned to be worn on set-up day. Worked out well because the denim has a bit of lycra in it -- so that was a comfy outfit for the flight home.
I had decided rather than taking a Monday morning flight back east (where I would probably not sleep worrying that I would miss an early alarm and miss my flight) I would take the midnight red-eye. It worked well and I arrived back at my home airport around 7 am. Needless to say, though, I slept most of Monday once I got back home.
I decided to use two of my outfits from the Novi show in September and made a couple new things -- three t-shirts, one a remake of a rtw tee and the others something from the stash; a knit camisole to wear under my twist top; a new blouse and picket skirt; and a pair of denim pants that has flat felled side seams to simulate jeans (so they are more of a trouser jean).


The days were long (show hours 8:30 am to 6 pm Thurs, Fri, Sat and Sun ran "only" til 5 pm). We were tired at the end of every day but enjoyed talking with all the people who stopped by the booth, The Complete Clothier.
The green t-shirt was worn on the trip out and the paisley t-shirt was worn on set-up day. On show days I wore my Novi green twist top/brown cami/brown fitted pants, Novi tweed jacket/yellow cowl top/green fitted pants; new blouse & skirt; and the t-shirt/"jeans" on Sunday.
Sunday's theme at the expo was Red-Pink day -- Red for women's heart health and Pink for breast cancer awareness. Neither are colors I wear often but had the wild t-shirt knit in the stash that also has some teal and goldish orange in the print. The print picked up the "jeans thread" topstitching I did on the side seams so that became my Sunday outfit even though the jeans were originally planned to be worn on set-up day. Worked out well because the denim has a bit of lycra in it -- so that was a comfy outfit for the flight home.
I had decided rather than taking a Monday morning flight back east (where I would probably not sleep worrying that I would miss an early alarm and miss my flight) I would take the midnight red-eye. It worked well and I arrived back at my home airport around 7 am. Needless to say, though, I slept most of Monday once I got back home.
Saturday, December 19, 2009
Christmas Knitting - part 1
Have you ever knitted a potato-chip scarf? Ever heard of one? A friend of mine told me she was making one and so I had to go on Google and find one, too.
I found several patterns -- and the name can mean a couple things. One, it looks like a long curly fry. Two, you can't stop at just one.
Basically it is a knitted flounce that can be worked to any length. The first pattern is done on a circular needle and casts on anywhere from 50 to 110 (or more) stitches. The scarf is knitted in garter stitch a total of 8 long rows, with every other row doubling the stitches by knitting an increase in each stitch. Another pattern casts on only 20 to 24 or so stitches and is worked in a series of short rows (stopping part way and then turning the work and knitting back to the beginning of the row).
The problem I had was determining if I had enough of any one yarn to work the long scarf. It is definitely the eaiser pattern since you don't have to do any counting -- just sit and knit. I figured if I did the short-row version I could just keep knitting until it was the length I wanted or I ran out of yarn.
So I did a test of the first short-row pattern. I have ~240 yds of a discontinued yarn -- Sensations Carlo that is described on the label as a "versatile shimmering tape yarn."


The pattern beautiful and actually makes a double flounce. But I could tell I didn't have enough yarn to make a scarf long enough to be usable. Maybe I could make it long enough to attach to a garment as a collar .. but that's not my style.


and VOILA -- the finished scarf -- ready to be wrapped and shipped ....

This was an easy project -- one row all you do is knit. The next row you increase by knitting in front and back of each stitch. No counting! But by the end if you can't work an entire row in a sitting, with the yarn I was using (Yarn Bee, Boucle Traditions) it was hard to tell if I was on a straight knitting or an increase row. So when I would leave the work, I would leave myself a note stuck to the needles.


Since I have another ball of this yarn -- I am going to make another for my daughter to go with her new black jacket ... and then I'll work on my green one ... and then ... (can't stop at just one!)
I found several patterns -- and the name can mean a couple things. One, it looks like a long curly fry. Two, you can't stop at just one.
Basically it is a knitted flounce that can be worked to any length. The first pattern is done on a circular needle and casts on anywhere from 50 to 110 (or more) stitches. The scarf is knitted in garter stitch a total of 8 long rows, with every other row doubling the stitches by knitting an increase in each stitch. Another pattern casts on only 20 to 24 or so stitches and is worked in a series of short rows (stopping part way and then turning the work and knitting back to the beginning of the row).
The problem I had was determining if I had enough of any one yarn to work the long scarf. It is definitely the eaiser pattern since you don't have to do any counting -- just sit and knit. I figured if I did the short-row version I could just keep knitting until it was the length I wanted or I ran out of yarn.
So I did a test of the first short-row pattern. I have ~240 yds of a discontinued yarn -- Sensations Carlo that is described on the label as a "versatile shimmering tape yarn."


The pattern beautiful and actually makes a double flounce. But I could tell I didn't have enough yarn to make a scarf long enough to be usable. Maybe I could make it long enough to attach to a garment as a collar .. but that's not my style.

I have another pattern I am going to try -- later, after the holidays -- that will make a single flounce and I will be able to use all the yarn to whatever length it ends up being. But, I wanted to make a gift and the giftee's (is that a word?) favorite color is blue.
So I found some yarn in the stash that had plenty of yardage and is a combo of blue & black -- so good to wear with jeans. I decided to cast on 90 stitches (size 11, 36" circular needle). On the increase rows that became -- 180 -- 360 -- 720 stitches -- and ended up a length ~5 ft total. I did a sample starting with 10 st (20 - 40 - 80) to make sure I would like the end effect with my yarn and needle size (tried a couple different needle sizes so I'd know what size to buy in the 36" circular) and then worked on the real one. You don't see the flouncing effect until you are finished and start to bind off.


and VOILA -- the finished scarf -- ready to be wrapped and shipped ....

This was an easy project -- one row all you do is knit. The next row you increase by knitting in front and back of each stitch. No counting! But by the end if you can't work an entire row in a sitting, with the yarn I was using (Yarn Bee, Boucle Traditions) it was hard to tell if I was on a straight knitting or an increase row. So when I would leave the work, I would leave myself a note stuck to the needles.


Since I have another ball of this yarn -- I am going to make another for my daughter to go with her new black jacket ... and then I'll work on my green one ... and then ... (can't stop at just one!)


