Sunday, May 1, 2011

welcome baby!

I wanted to make a little something to welcome a little someone to the world.  A friend of mine had asked me recently to teach her to knit (and we'll continue to work on that) ... and once I picked up the needles I just wanted to knit something!

After making myself a half dozen dishcloths for my own kitchen -- btw that is a very quick, easy and totally useful project -- I kept looking at a skein of yellow baby yarn that was in my stash.  It is yellow flecked with blue, pink, and green.   So I started one of those totally cute little rolled brim hats ... I just didn't have any green for the leaves on top.  A quick trip to JoAnn's and I had the perfect yarn and this is the finished hat -- hopefully not the only May flower that we'll get out of all these April showers!


Very springlike for a little girl.   But then ...... as I was looking for the green yarn I came across a yarn I had never seen before ..... a stretchy yarn.  Of course, just like some fabrics, it called out to me begging to be made into something.  I decided to buy a skein and make it into another hat, same pattern.  Because I loved the variegated colors, I decided the second hat would not have the "leaves" and just be knit as is for the entire hat.

Also, since the second yarn is lighter weight I figured it would work later into the summer months for those chilly breezes we sometimes get in the evenings or when in AC.   So that one I worked to be a little longer thinking that the stretch yarn will make the hat fit a little longer. 


Sooo this little girl will get a bonus and get both hats!   I keep worrying about the fit --first I think they'll be too big ... then I am sure they'll be too small .....  but regardless, they were fun to make!

Sunday, March 6, 2011

Something for the fellas!

Sewing for little girls and their dolls is so much fun!  The sky is the limit with ruffles, appliques, cute fabrics, lots of girly accents.

Sewing for boys is a bit more challenging to have some creative fun.  I know.  I have two grown sons.  I didn't do much sewing for them.

So the first thing I wanted to make was a pair of pants from camouflage fabric.  And what says "boy" better than some cargo pockets?


And here's a closeup of the cargo pocket.


I got really creative with some chocolate brown knit fabric, a scrap of the camo fabric, and a black t-shirt to creative a coordinating (NOT matchy-matchy) shirt.  Got the entire thing finished and didn't like the way I serged on the neckband.  Of course that was the last step.  And the package had to go into the mail the next day.  It was approaching midnight.  So .... more on that later.  It is waiting for me to remove the neckband and redo it. 

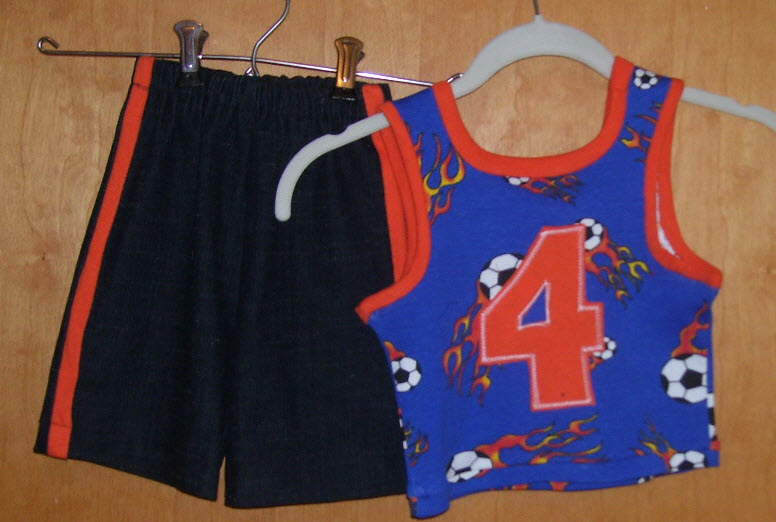
I was able to make a shorts outfit for the little guys.  The inspiration came from the fabric itself -- some blazing soccer balls.  That became a tank for summer.  An orange t-shirt was cannibalized for the neck ribbing and strips of orange knit to bind the neck and armscyes. 


Boys like their shorts long (or mine did) so these are knee length.  The orange accent on the shorts was another strip cut from the t-shirt and sewn into the side seams as a faux piping.  I cut a width of fabric and folded it wrong sides together and inserted it with all cut edges together before serging the side seam.  Then on the right side I pressed it flat and stitched it down.  Even though these will only be on display, were they to be worn for real, I know that strip would pucker and buckle with trips through the washing machine and dryer.

When I see anything soccer, I remember the years of sitting in the bleachers at practices and games.  A total of 18 years ... with no breaks!  From the first practice for the oldest son in 2nd grade ... to Senior Night at the high school for the youngest.  Of course, I thought the shirt needed a number on the back.

I found a font for free download on the internet that looked like jersey numbers.  I printed out a number 4 (my youngest son's number) on my laser printer.  It had a lot of black so I changed it to a light gray so I could still see it but wouldn't use up all my toner.

The technique was the same as for the tulips.  I traced the number onto Solvy and then used that as a stitching guide on a piece of orange t-shirt fabric.  The only caveat is that I had to make sure to flip the number so that when turned to the right side it would be readable.  For hearts and tulips it wouldn't have mattered.

It was a lot easier working on a large square of fabric just following the line, than if I had cut out the number and tried to stitch along the cut edge.  By including this step the applique has a nice folded edge.


So the number was stitched, then cut out close to the stitching, turned, pressed to the back of the shirt, and stitched with contrasting thread.  The Solvy doesn't adhere the applique permanently but it does help keep it in place as you are stitching it down.  It also serves as a stabilizer so the stitching is nice and even.


I actually did the applique before doing anything else on the shirt so I could work on a single layer in the flat.  But I had to wait til the end to show you as my surprise!

Tiers not Tears

Time for some skirts!

I had not intended to sew a 3-tiered skirt, but some fabric in the stash not only volunteered but insisted to be sewn!

My original intention was to do a two-tiered skirt with denim as the top tier.  I had that, a dark wash with some lycra.  Then as I went looking for a good complement, I saw not only the yellow calico with a delicate navy floral motif but also some navy shirting fabric that has a tiny white windowpane effect.

The colors were perfect to arrange the tiers from heaviest weight fabric at the top progressing to the yellow for the bottom ruffle.


This skirt was constructed solely with the serger.  First I serged one side seam on all tiers.  The hem was a rolled hem with navy thread, the tiers were gathered using the differential feed and then sewn together as a separate step.  The waistband was cut the same width as the entire top tier, folded wrong sides together, and serged to the skirt.

Next I threaded the elastic through the waistband, using some pieces of fabric as tabs on each end of the elastic so I had tails to work with and didn't worry about the elastic pulling into the waistband.  I secured the elastic to the tabs with a multi-step zigzag so that it would not pop off.  Doing this allowed me to pull the elastic just up to the seamline but not into it.  I could now serge the side seam without serging over all the layers of fabric plus heavy layers of elastic.  

The complementary shirt planned, cut, but not yet sewn, is a little blouse of the yellow calico.  More about that later, if when it is sewn.

Now for the other skirt.  This is a little of an inside joke.  Long time ago when we first tested the tiered skit pattern, for test fabric we had yards and yards of a nice stable jacquard in shades of a jade green and fuschia pink.  I used those, alternating, so we could see the seamlines clearly in pictures.  Jokingly I called it my "watermelon" skirt.

Boy was I surprised when I saw garments of the same fabric (I swear it was) in the Coldwater Creek catalog!  I have to say I love the fabric.

So I decided I had to made a watermelon skirt for the display.  Sewing for children and dolls is great because they don't need yardage, they only need scraps!  For this skirt I chose the two-tiered skirt.  However, the default horizontal line on these tiers is at the halfway point between waist and knee.  I've never seen a slice of watermelon that has as much pink as green.


I shortened the overall length of the skirt and then used the tools to change the proportion of the layers.  I found some wide white lace that I'd picked up on a roll (probably on clearance for $1) that had a gathered edge.  I wanted flat lace.  Scissors to the rescue!  I cut a length the width I needed for the little girl's skirt, and then trimmed a narrower piece for the doll. 

Instead of a rolled hem, I did a shirttail hem for this skirt.  I did use the serger's differential feed to gather the bottom tier.  The waistband/elastic was also handled the same as for the other skirt.

So -- do you think the watermelon skirt will be a trend for spring?


Good thing I didn't have a teardrop shaped stitch on my machine or I might have gone over the top by adding some black seeds to the top of the skirt.  Still on the lookout for a good fabric to use as a top.


Saturday, March 5, 2011

Tiptoe through the tulips?

My daffodils are up about 6" and I have crocus in bloom -- so it only seemed fitting to use tulips as the theme for these little capri pants.

I have had the pink striped fabric in my stash for probably close to 25 years and this was the project for it.  The ruffles have serged rolled hems.  For the appliques and pockets I again printed out the pattern pieces using the Scaling feature in Print Layout of The Complete Clothier program.  However, I did not cut out the pieces ... yet.


I traced the flowers onto Solvy (I used a fine point red sharpie since I didn't want black).  Then I placed that over the right side of the fabric -- and since I could see through the Solvy, I could turn as I wished to get the stripes the way I wanted them.  Next I just stitched around the flower with a small straight stitch on my tracing line .  Finally, I slit the Solvy and turned the flowers so the seams were now on the inside.  Using a steam iron, I pressed them into place on the front of the pants and then stitched them down using a smal zigzag stitch.  The process really was quick and easy.

For the pocket (large flower) I used two layers of fabric so that when it was turned, the Solvy would be in the center and the pocket was self lined.

The doll's appliques were left raw edged and single layer, even though I did trace the small flowers onto Solvy and used those as the patterns.  The were simply pressed to the pants and then stitched into place.

The little girl's pants have graduated sizes of tulips while the doll's are all the same size.  So while they match, I didn't try to duplicate them identically down to the last detail.

A tank top is planned to coordinate and even cut out, but I ran out of sewing time.  Maybe I'll work on it this week so they are ready for thext next exhibit.


FedEx?  Research is still pending and I am to call back later to check on the status.  And trust me, I will keep checking.

something for the little ones

It's that time of the year again -- Sewing and Stitchery Expo in Puyallup, Washington (near Seattle).  Once again The Complete Clothier has a booth but this year I didn't make the trip.  I'm busy at home with some other obligations.

So I volunteered to sew a couple things for the display.  I enjoyed making a few things for our youngest model at the Novi show and thought it might be a good idea to have some fun kids' things on display at Puyallup.  It's been many years since my offspring were young enough to wear this type of fun fashion and frankly I was too busy working, cooking, driving, and bleacher sitting when they were this age to do much sewing for them.

Let's start with the easy ones -- something for girls.  Most of the garments were inspired by the fabric.  Once I found that, then I created a garment to showcase it.

First up is a piece of soft peacock blue pinwale corduroy ... to me that said JUMPER.  Found a cute print to go along with it for a blouse that had a heart and flowers motif.  The perfect complement was a satin polka dot in two shades of hot pink.    The heart theme was carried out with pockets.  I had intended to do a banded collar with the polka dots as the collar band and the heart fabric as a stand up, rolled edge ruffle.   Can we say ... not enough time?  Backup plan was a satin neck binding instead.


The hearts are a single pattern that were sized in Print Layout to different percentages so that I didn't have to redesign the heart multiple times.  The bottom one is a faced pocket (100%) and the top two are appliques (60% and 40%).  I stitched the appliques to fusible interfacing, slit the facing and turned to enclose the seam, and pressed to the jumper before edge-stitching with a decorative blanket stitch from my machine.  I wasn't totally happy with that because the interfacing "puffed" a little at the edge .... so you will see in a future post a different method that worked a little better.

Did I mention that I used two figure charts?  One for a little girl and one for her doll?  By cutting and sewing at the same time, it felt like the doll clothes just magically appeared instead of being a project on their own.  The machine was threaded -- I just did each step at the same time.


The only real difference for the doll was that all the hearts were the same size (20% of original) and all were appliques ... I didn't think she needed a pocket.

Another technique I used was a serged rolled hem on the "cuff" of the sleeves.  To create the ruffle I zig-zagged over narrow elastic so that the thread created the casing.  I did that in dark pink thread so that there was a touch of pink on the bottom of the sleeves to tie in with the neck binding and the appliques.  If there had been more time (there is never "enough" time) I might have done a rolled edge on the bottom of the sleeve in hot pink ... as it was, I had only light pink cone thread and the one thing I hate to do is change threads on the serger.  It was a lot easier and quicker to change the thread on the sewing machine instead.

A side saga .... I sent the clothes out on Monday Feb 28, FedEx 2-day, so they would be delivered to the hotel on Wednesday ... so they could be taken to the booth on Thursday morning, the first day of the show.  The "crew" leaves the hotel at about 7 am to be able to be on the vendor floor ready to go when the doors open.  Ummm, my Office Max receipts showed that it would be delivered on Wed, Mar 2 ... when in reality it didn't get to the hotel until almost noon on Thursday.  I have a claim filed ... currently "being researched."   I will keep you updated.   I don't want to pay $35 shipping for delivery that didn't happen when promised.  The tracking shows that the pkg sat in Memphis all day Tuesday before being shipped out to Seattle on Wednesday morning.


Sunday, January 9, 2011

brrrrr, it's cold outside

I was sorting through some of my remnants and two ended up together in the pile and said "Make something with us!  We think we belong together!"

It was a pink fleece and a wild t-shirt knit.  So the fleece became a darted t-shirt from my TCC pattern and the knit became a binding around the neck, sleeves, and hem.

I wanted to make the binding wide enough so enough of the coordinating pink was visible and made a conscious decision to "bulk" it up so it would add some dimension.  On hindsight, after wearing it, I think the bindings are a bit heavy and now wish I'd used a different technique.  There's always the "next" one.


However it meets the following criteria:  It fits.  It is warm.  It is cheerful.

What more could I ask?  

Let's get organized!

I knew I'd be making more of these purse organizers!  This batch was for a group of friends and they had told me their favorite colors -- green, orange, and blue.

The outside was a denim remnant from a long ago pair of jeans and the linings were fat quarters that I cut in half and seamed to get the length.  They aren't bandana prints but do have a little of that look.  Each are bright enough to be visible inside a purse.


Each was topstiched in a coordinating color and this time I used the bartack stitch at the top of each divider stitching.  I added a few little goodies to give a clue how they could be used, again color coordinated.


I couldn't believe my luck at the dollar store with the perfect gift bags!   I didn't want to ruin the effect with a gift tag so each was marked with an appropriate color ribbon on the "purse" handle.


Wednesday, January 5, 2011

More Canine Couture

I actually thought I had posted the second jacket --so here it is now.

Of course Louis fell between two sizes.  Of course even though the pattern had several views, his owner wanted the hood and short sleeves -- so that just meant using the hood from view G and sewing that instead of a collar onto view F.

Here's a link to the pattern  McCalls 5776

The fabric for this was taken from a little dog "blanket" that I bought at JoAnn's on Halloween clearance -- the black with the white bones ... perfect!  And of course, I just saw it as fabric.  With the sale price on the fleece with a sale pattern ... this little jacket cost only $2.25 out of pocket.

I tried to keep the blanket stitching edge wherever possible, using that for the hood and the sleeve and coat hems.  When we had the first "fitting" I realized that it would be a poor choice for the sleeve hem since the toe nails were likely to catch and the jacket itself was too long.  So the sleeves got turned up with a little cuff and stitched and the shirt itself was shortened.

We also decided that the underside would need to be scooped a bit more so that it stayed dry -- those alterations were done with scissors until we were happy with the fit.


Talk about a custom garment!  And a perffect contrast for his fur. 

Monday, December 27, 2010

Canine Couture

Louis came for another holiday visit -- my how he has grown.  From 5.5 lbs last year to 11.4 lbs this year.  You can see the difference in the size of the water bottle!  (same brand)


Ohio had a little more snow and colder weather than he's used to in Georgia, so we decided it was time for a new coat.  Actually we have a couple more planned as well.  The first one is from McCalls 6218.  We shopped the stash and decided to use the same blue fleece from last year and paired it with a traditional woven plaid for the lining.


Once I started sewing it became clear that the blue fleece should be the lining to provide comfort and warmth -- and the plaid for the outside.  The blue fleece was better for the contrasting scarf.  Here's the finished coat.


Maybe I don't know how to measure dogs, but I thought his length is 14" and his girth is 16". I had measured around his belly and from the pattern envelope it would seem that the Large is the correct size.  It seems too big around, but we accommodated that by trying it on him and then deciding where to attach the velcro.

Tuesday, December 21, 2010

Exchange gift

'Tis the time of year when we need token gifts but want them to be nice.  The criteria for this exchange is that it can be handmade (or not), have a sewing-related theme (or not), but must be < $10.

I decided to make a simple little purse organizer--the tutorial was found here:  purse organizer tutorial

I happened to have some striped ultrasuede that looks a little like denim and includes a rainbow of colors.  Since I have no idea about who the recipient will be in this grab-bag exchange (other than it will be a female), I figured this would work.  Her favorite color has to be in there somewhere, right?

Then it meant digging in the stash for something to use as the lining.  I could have been conservative with a solid color but found some calico that was more fun.  The colors seemed to be echoed in each piece.


I used the dimensions of the original tutorial since again, I don't know whose handbag will become home to this organizer and I don't want it to be too big.

I didn't take pictures of it in process, but some things I did were to make sure that I pressed the seams open on my pressing buck before turning.  That helped to have a nice edge, especially on the ultrasuede. I used my stitch-in-the-ditch foot to make sure that the edgestitching was even and I used a size 16 denim needle.  Another thing was that I rounded the corners to make it easier to turn the ultrasuede and avoid any lumps.  I used a tape dispenser as my template to get a nice curve. 


I used the stitch that backstitches at the beginning and end of the row of stitching to make sure that the vertical "divider" stitches wouldn't some undone with use.


It can be rolled up like a jelly roll for a small purse, or it could be just be allowed to wrap around the entire perimeter for a larger purse. 

I think there will be a few more of these to come out of my sewing room this year ....

Saturday, December 18, 2010

More ruffles?

Yes more ruffles!  This is actually a knitted flounce.  You may remember that I made some of these last year.  Like those, this one is also a gift.


 The yarns are both very soft -- the main yarn is 70% soft acrylic/30% cotton (Bernat denimstyle; color 03117) and the trim "eyelash" type yarn is 100% polyester (Yarn Bee- Frosting; color is Polar Icing).  The combination made for a very soft boa.  I went looking for anything "blue" that I had in my yarn stash and these were the winning candidates:


The pattern was a little lacier than the one I used last year.  It starts off with 110 stitches and after 11 rows there are almost 900 stitches on the needle before binding off.  I think I like this one better. If you want to make one, the pattern is from Lion Brand Yarn -- just search on "potato chip scarf."

When worn, it curls up into itself, but here is a close up to show some of the detail:

Monday, September 27, 2010

What I don't want to sew again any time soon ...

 In no particular order ....

challis
chiffon
fabrics that right and wrong sides are "almost" identical
prints that are difficult to see markings
ruffles
ruches
gathers
wool (sewing-friendly fabric but it makes me itch)
drapery fabric


I know I will sew some of the above again, but not any time soon. 

Saturday, September 18, 2010

Deja vu? More of the same ...

... but, different, of course!

One last garment for the style show that will be worn by a dress form (but not the one in the picture).  It will be a dress form made to the same measurement chart used for the garment, so the next best thing to a human model.

 Now, the details --
  • Same -- fabric as two other garments
  • Same -- shoulder princess silhouette
  • Different -- blouse instead of a dress
  • Different -- closure ... button front instead of zippered back
  • Different -- collar ... this is a convertible
  • Different -- sleeve
  • Different -- addition of some pockets


This fabric was a perfect candidate for the tabbed sleeve because it can be rolled up or ruched  and the inside of the sleeve looks like the outside.  I did sew the sleeve with a French seam so that the seam would be clean and as unobtrusive as possible.

rolled sleeve
ruched sleeve
I think either will be nice when there is an arm coming through the sleeve.  For the dress form, however, I would choose the rolled version.

One thing I'm still on the fence about is adding pockets to the front.  I made a couple small ones that have a pleat and topstitching.  The topstitching echoes that on the sleeve tab and complements the contrasting buttons. 

Sorry for the color -- the pic was dark and when I lightened it to show the detail, the color went funky.

This is a pocket with a pleat where I topstiched the edges of the pleat and put on a top band that used the crossgrain wrinkle of the fabric.

I kept the pockets small since they are more for accent than function, although big enough for a hankie (boy, that word dates me!) or some pocket change.

I don't want them up at the bustline but had thought maybe at the hemline, aligning the pleat detailing with the underlying princess seamline of the blouse.


with pockets pinned on         


    I'll think more about the pockets and then can always be sewn on later.  I just would not want to have to frogstitch them off.


    Tuesday, September 14, 2010

    Scarlett, eat your heart out!

    Scarlett O'Hara may have had green velvet ... but did she have bead trim?

    This is my last (hopefully) garment for the style show; there is possibility of one more but I am hoping that that one is canceled.

    The particulars -- a TCC sheath dress with an envelope collar and a loose sleeve shortened to just above the elbow.


    Some techniques I learned with this dress --

    • how to cut continuous bias strips
    • how to make piping
    • how to sew on beaded trim


    Some other things I learned with this dress --

    • It probably is NOT a good idea to use home dec fabric (ie drapery fabric) for a garment -- no matter how it turned out for Scarlett.  I used a whole bottle of Fray Check around the cut edges before I even started to work with the fabric.  I was afraid that even the serger couldn't tame runaway ravels.
    • It probably is NOT a good idea to cut drapery fabric on the crossgrain just to get the slubs to run vertically in the garment.  Also, NOT a wise idea to cut the collar on the the straight of grain just to get the slubs to run horizontally.  It just seems right to have the the lines moving those directions -- but I fear for the drape (no pun intended) of the garment.  
    • A hem that has been cut on the crossgrain is going to need to be sewn by hand.  Trying to use the machine makes for ripples and ridges that should only be in potato chips.
    The best thing I learned is either that I can tackle and conquer some ambitious tasks ... or .... how good it feels to be finished.

    Right now, I have to say it feels GREAT to be finished.  When I rest up a bit I will put on my own garments so I can post those pics.

    Saturday, September 11, 2010

    The same ..yet different


    Today's title reminds me of when as a little girl I'd try to tell my dad that things were "exactly the same ... but different" .... amusing to him yet it made perfect sense to me!


    These two dresses for the TCC style show at Novi are both in a crinkle woven that actually sewed like a dream.  Same.   The pattern for each is the shoulder princess dress.  Same.   The collar and neckline on Dress 1 is a lowered jewel with a turtleneck on steroids; Dress 2 has a v-neck with a convertible collar.  Different.  The sleeve on Dress 1 is a shirt sleeve that has been widened and lengthened at the wrist to add fullness that is contained with a cuff; the sleeve on Dress 2 is a skirted tiered sleeve with some "princess" seaming.  Different.  The dresses are made from two distinct measurement charts.  Different.

    Dress 1


    Dress 2
    The skirted tiered sleeve is one of my favorites.  Once this sleeve was chosen, the sleeve tool allowed me to shorten the overall length and make other preference changes.  Then I had a dilemma -- did I want to cut all the sleeve pieces on grain or did I want to do some on the cross grain?  I tried both ways and still had a dilemma -- I liked them both and each had pros and cons.

    Sleeve A:  The one where all the pieces were on grain.  Pros were that it sewed together a little easier (because of the crinkles) and hangs ever so gracefully. Cons are that you can't really see the panels since the seamlines hide in the crinkles.

    Sleeve B:  The one with every-other piece on straight or cross grain.  Pros were that you can see the panels and it still hangs beautifully.  The only con I could think of is that some may think I made a mistake (gasp!) when laying out and cutting the pieces.

    A: On-grain pieces


    So while I am a stickler for accurate details, I am not afraid to 'fess up when I've goofed.  In this case, it was intentional and not a goof.

    B: Some cross-grain pieces


    And the winner is --

    So, see?  The same ... yet different.

    Wednesday, September 8, 2010

    Under the Tuscan Sun

    Been sewing like mad and have a few more garments finished .. just need to take some pictures and get them posted.  Here's a quick project that I finished this afternoon --

    I wanted a new pair of pjs that I could take to Novi that didn't look like they had come out of the rag bag.  So  Saturday I looked at t-shirts at WalMart and found one in a pale orange on the clearance rack.. 

    I have lots of flannel in my stash with cute prints but thought maybe a nice cotton would be better for this time of year, especially since I wanted a pair that would hit mid-calf.  At JoAnn's Labor Day sale I checked the clearance tables and found a cute Debbie Mumm print with a Tuscany theme in just the right colors and then found some cute ribbon also on clearance.  (Do you get the idea I that I love a bargain?)


    The shirt was $3 and the pants cost $5.79 if you don't count elastic or thread from my stash (and who counts the stash anyway????)   

    So this is my "fun" sewing ... still have 2 style show garments and 4.5 booth garments (what I will wear) to finish and am watching the calendar days fly by -- 9 sewing days left --  at least I'm not counting the hours just yet. I've completed 20.5 items  counting the pjs so am still breathing and not hyperventilating just yet.  I'll be posting some new pictures soon.


    Publish Post

    Wednesday, September 1, 2010

    All buttoned up

    Here she is ... ready for her appearance at Novi ....  pretty good fit for a gal with only half a torso and no arms!


    It was a little tricky taking her measurements but the pattern was not altered and as you can see, no pins, clamps, or clips in the back of the blouse.


    I did built a little ease into the blouse as if she were a real person, just so it wouldn't be too difficult to button the buttons.  Plus, showing a skin-tight fit wasn't exactly my objective.